Thursday, August 23, 2018

VERY QUICK, VERY EASY & GLUTEN FREE ITALIAN TURKEY SAUSAGE, POTATO & KALE SOUP


Italian Sausage, Potato, & Kale Soup

I can eat soup all year round. I love cold and hot soup in hot weather and hot soup in cold weather.

Yesterday, when browsing through a store, I happened to find a restaurant soup recipe similar to this one but changed it to suit my taste and what I could find available at the store. It's gluten free, which does not bother me one way or the other, but I know that some of my friends eat gluten free, so this may appeal to them.

1 pound bulk mild Italian turkey sausage (I purchased mine at Publix)

1 cup finely chopped onion

2 teaspoons finely chopped garlic or 1/4-1/2 teaspoon dried garlic 

1 1/4 pounds white potatoes, peeled and cut into bite sized cubes

3 cups finely chopped curly kale

4 cups water

2 tablespoons chicken base (Better than Bouillon)

1/2 cup heavy cream

In a large Dutch oven, over medium heat, cook the turkey sausage and the onion until the sausage is no longer pink. Add the garlic or garlic powder, potatoes, kale, water and chicken base. Bring to a boil, and simmer covered until potatoes are tender. This should take about 15-20 minutes. Add heavy cream, bring the temperature back up to simmer. Remove from heat and serve.   


Enjoy!

Wednesday, January 3, 2018

THAT BLUEBERRY PIE, YES, THAT ONE!


HAPPY NEW YEAR PIE

Remember Elaine's "big salad", well I can do better than that. I made a "big pie", and, after eating it, I am going to wish that I had Elaine's salad. Although, I must say it was delicious and worth every calorie.

I have always loved blueberries. When it was time for me to decide on a dessert for my New Year's Day dinner, I remembered the big bag of small, sweet, Maine blueberries that I had in the freezer, and I thought this would be a good time for pie. Since I thought I might have eight people here eating collards, peas and pie, I decided that it needed to be a big pie. So, instead of the usual pie plate, I took out a heavy, deep dish casserole. The dish worked perfectly, and the pie was delicious.


By the time dinner came along, and the pie was sitting on the counter cooling, I realized that I would be eating dessert alone. I got out one of my favorite French glasses and put in spoons of the warm blueberry pie, and then poured in a couple of tablespoons of heavy cream. This was my grandfather's way of eating pies and cobblers, and it's mine too. I hope you enjoy the pie. It is one of my favorite recipes. I just have to find more people to eat it with. 

The recipe-

5 cups frozen blueberries, (no need to thaw)
3/4 cup plus one tablespoon sugar
4.5 tablespoons flour
1/2 cup water
1/4 cup orange juice
1 teaspoon lemon zest
1 package of two pie crust
heavy cream
Demerara sugar

Place one pie crust on the bottom and up the sides of a large pie plate or oven proof casserole dish that has been sprayed with non-stick cooking spray.

Add sugar, flour, juice, zest, and water to a large bowl and mix in the 5 cups of blueberries. Pour the berry mixture into the pie crust. Now place the second pie crust on top and take it down under the sides of the bottom crust. Seal the crusts together by crimping the edges with a fork, see photo. This keeps the blueberries from going out of the side and into the bottom of the plate. Now,  make several holes in the pie top with your fork. This helps the steam escape. Brush the pie crust with heavy cream and sprinkle liberally with Demerara sugar. Bake at 350 for about 60-90 minutes or until the pie is bubbling in the center, and crust is brown. If crust starts to brown too much before the pie is cooked, cover it with foil.


I had two refrigerated pie crusts from a grocery store. It's the best one out there as far as I'm concerned. It's their brand. If you want to know what it is, please ask me and I will tell you. This crust is always crisp, and it taste good.

Friends had given me citrus fruits when I visited them the day after Christmas, and it was right off their trees, so it was really fresh. I used a little lemon zest and orange juice for the pie. I have found that using both lemon and orange imparts a gentle flavor, and the two fruits counterbalance each other.

I hope you enjoy this pie. I know I sure am. I'm still eating it.


Tuesday, January 2, 2018

A NEW BISCUIT RECIPE, BREAKING ALL THE RULES!

A flaky and delicious biscuit

I went to the grocery store today with the idea that I would get some soft Southern wheat flour to make biscuits. I wanted to do something new and try to create a recipe that was light, but had a good texture. A biscuit that would hold a piece of ham or pork tenderloin, and could be eaten like a sandwich. I had a specific "design", in mind. Well, the store was out of that flour, so I found a Southern biscuit flour.  I've used it before, and thought, why not. So, I grabbed a bag and came home to make the biscuits. And, that I did. 


I preheated the oven to 450 degrees.

I got my big old yellow Pyrex biscuit bowl out and put in 3 cups of flour (Southern Biscuit Flour-this is self rising flour and already has the soda and baking powder in it). I measured by the dip method. I grated a stick of butter into the flour using the large hole side of the grater.  And, I added a half tablespoon of Rapid Rise Yeast, and tossed the mixture together with a big silver serving spoon. It stayed cold. Since this was an experiment, I had to measure, test and write. So, I alternated cold buttermilk and cold heavy cream, until I used 3/4 cups of each. And, I tossed again with the big silver spoon between each installation of buttermilk and cream. I let the mixture rest a little between each mixing (20 seconds) so the liquid could absorb into the flour. Finally, a moist, slightly stiff dough, which I kneaded in the bowl until it came together really nicely. Remember that old saying about not handling the dough too much? Over the years, I have found that you get just the opposite affect, that it does not make the dough tough. And, that's what happened here. 

At this time, I took out a large black cast iron skillet and added 3 tablespoons of President's butter. I put the skillet it in the oven to melt the butter and get VERY hot. 

Now, I am ready to roll some dough, so I put down on the counter-top,  two large pieces of plastic wrap, and sprinkled some flour down. I put the dough on the flour, coated my French rolling pin with flour and rolled the dough out to 1/2-inch thickness. I cut out 10 biscuits using a 2-1/2 inch cutter.  I only had to re-roll the dough once, which gave me 2 1/2 biscuits. I put the biscuits in a stack, then took the hot skillet out of the oven, spread the melted butter around the skillet and dipped the top of each biscuit in the butter and then turned it over so the buttered side was on top. I put the first batch in the oven and baked for about 6 minutes. At that time I checked to see how done and they were almost finished, so I turned the broiler on. My skillet is 3 rungs up from the bottom in my oven, so I watched the biscuits carefully, as the top of the biscuits browned and finished cooking.  I had those 2 1/2 biscuits left over, so I handled them exactly the same way. IT WORKED PERFECTLY! These were by far the best biscuits I've ever made.


The idea was to use some of my raspberry-pecan-herb pork tenderloin from my New Year's Day dinner, and put it between a good biscuit and smear with some horseradish sauce and Bradford Family Molasses.  It was all just perfect.

I have not copied this biscuit recipe from anyone or any recipe, so I hope you can follow my long, drawn out directions and that you are as successful as I was.


Monday, January 1, 2018

HAPPY NEW YEAR! BRADFORD FAMILY FARM COLLARDS & MOLASSES ROAD TRIP


BRADFORD FAMILY FARM HEIRLOOM COLLARDS & WATERMELON MOLASSES


It has been a long year, and one full of many changes for me. I've had a lot of life changes this year with the death of my husband, and a move from my house to a smaller place, but now I start a new year, and it's time to get back to what I love, and that is writing about food and people. This road trip story to the Bradford Family Farm in Sumter, South Carolina, is perfect start for my new blog format, because it involves great food and the wonderful people who grow it.

It all started last summer when a Facebook friend posted about the Bradford Heirloom Watermelon. On my Facebook page, I saw the owner of that farm, Nat Bradford, as he delivered those beautiful watermelons to excited Charleston chefs.  I didn't put my name on the list, because I didn't think it would be possible to get even one watermelon, because they seemed to be in great demand.

Then, last month, I saw the notice from the same FB friend that the grower of the heirloom watermelons was growing heirloom collards. Since I had grown up in the Alabama Black Belt and had eaten some of the best food in the land (according to me),  I wanted to try these new, "old collards". These "heirloom" collards were supposed to represent all that we had lost in flavor and tenderness through the years of mass farming, hence my personal introduction to Nat Bradford, and the Bradford Family Farm.


Nat Bradford, the great farmer behind the heirloom collards
now growing in South Carolina.

I wrote to Nat, and he was very gracious and told me that I was on the list. Finally!  Every few days, Nat Bradford would pop on FB and give us an update. He would say, "the collards should be ready by the end of next week". I waited as patiently as a woman who has been pregnant for 10 months.

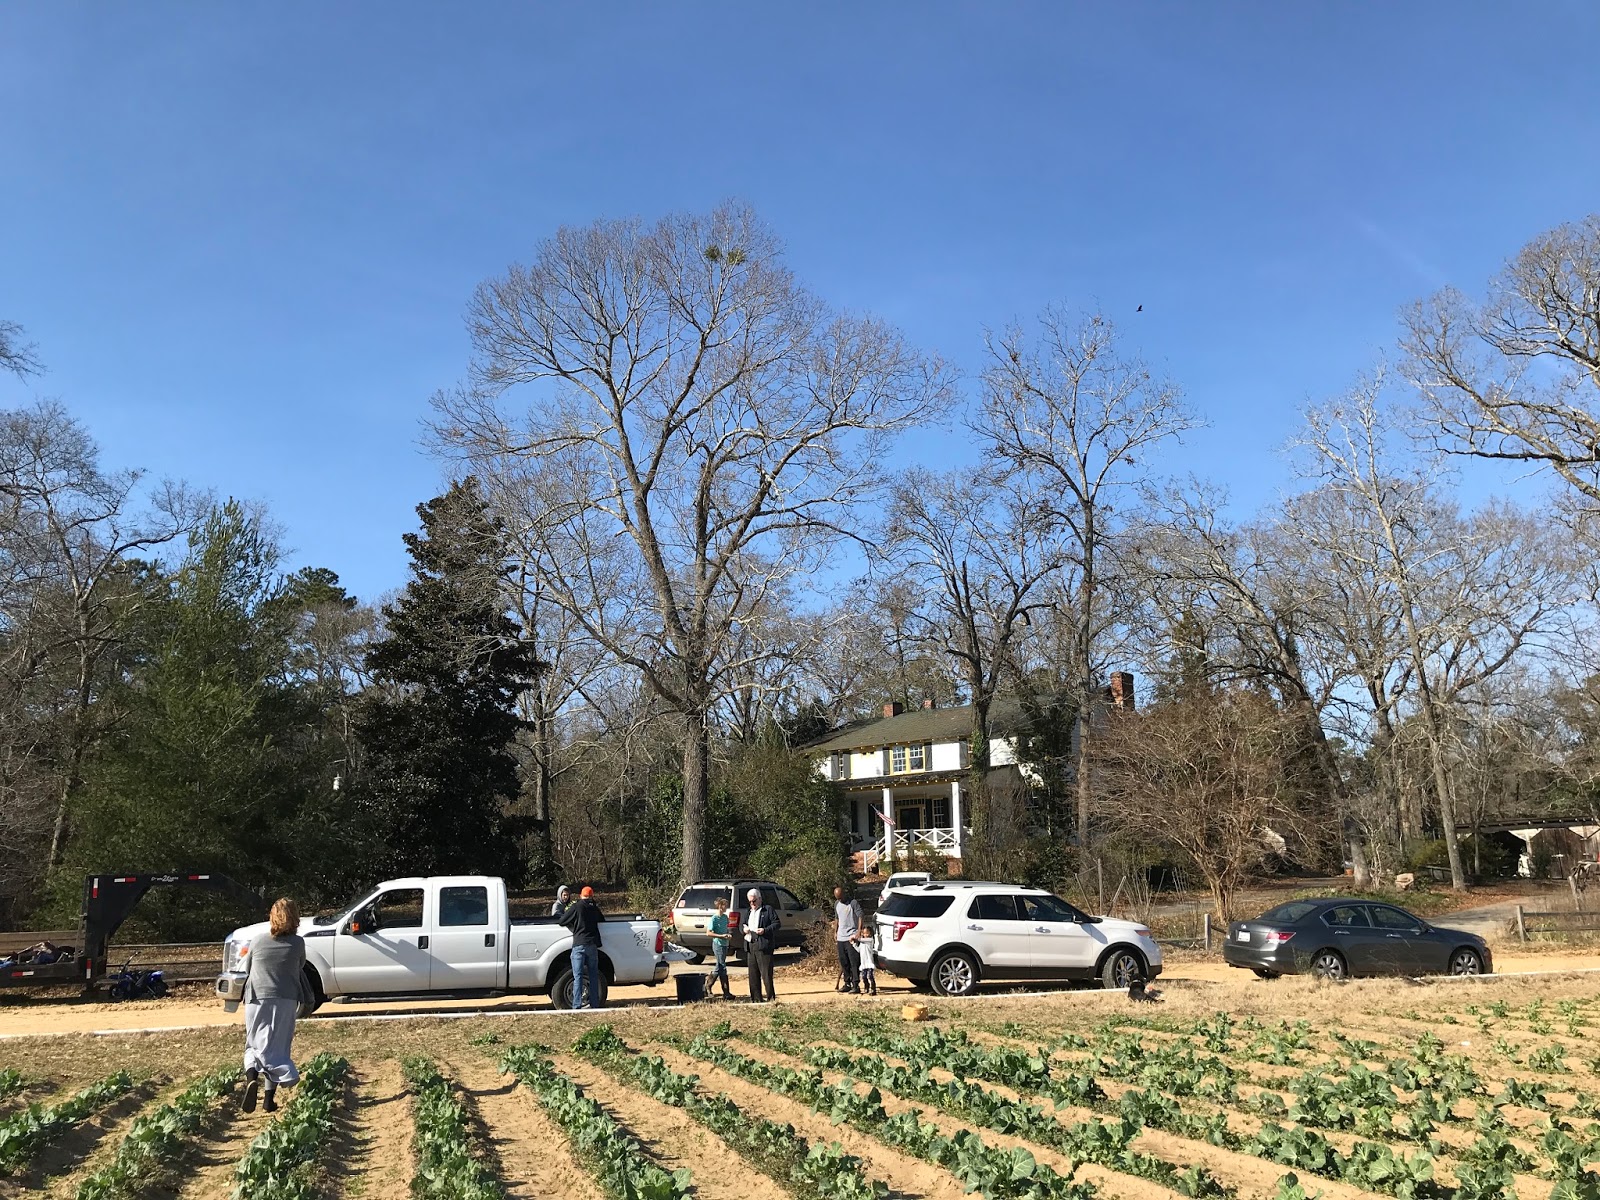
The day finally came, and Saturday morning I got in my car, and drove over a hundred miles, to the Bradford Family Farm up above Sumter, South Carolina. I loved that Nat and I introduced ourselves and the next thing he did was to give me a hug, and he hugged everyone who came up to get collards, while I was there. I think that says a lot about someone. It means to me that he cares about people.  Yep, he is my kind of people. 


Bradford Family Farm

While there, Nat, gave a tour of the collard field, explaining to me and to two other chefs who were from Myrtle Beach, how he had grown the collards and what he looks for in this heirloom variety, while we occasionally chatted about how we cook our greens.

Nat gave each of the chefs a young, raw collard leaf to taste. It was amazing the distinct flavors that were present with just one bite. First the fresh collard taste, the peppery taste and in the taste of the stem there was an incredible amount of sweetness. It was a great experience.


It started to get very busy there, so after getting my collards and Bradford Family Watermelon Molasses, I said my goodbyes to everyone, and started my hundred odd miles back to the Charleston area to get ready for the holiday. But, before I got home, I shared one bag of the collards. We always need to share.

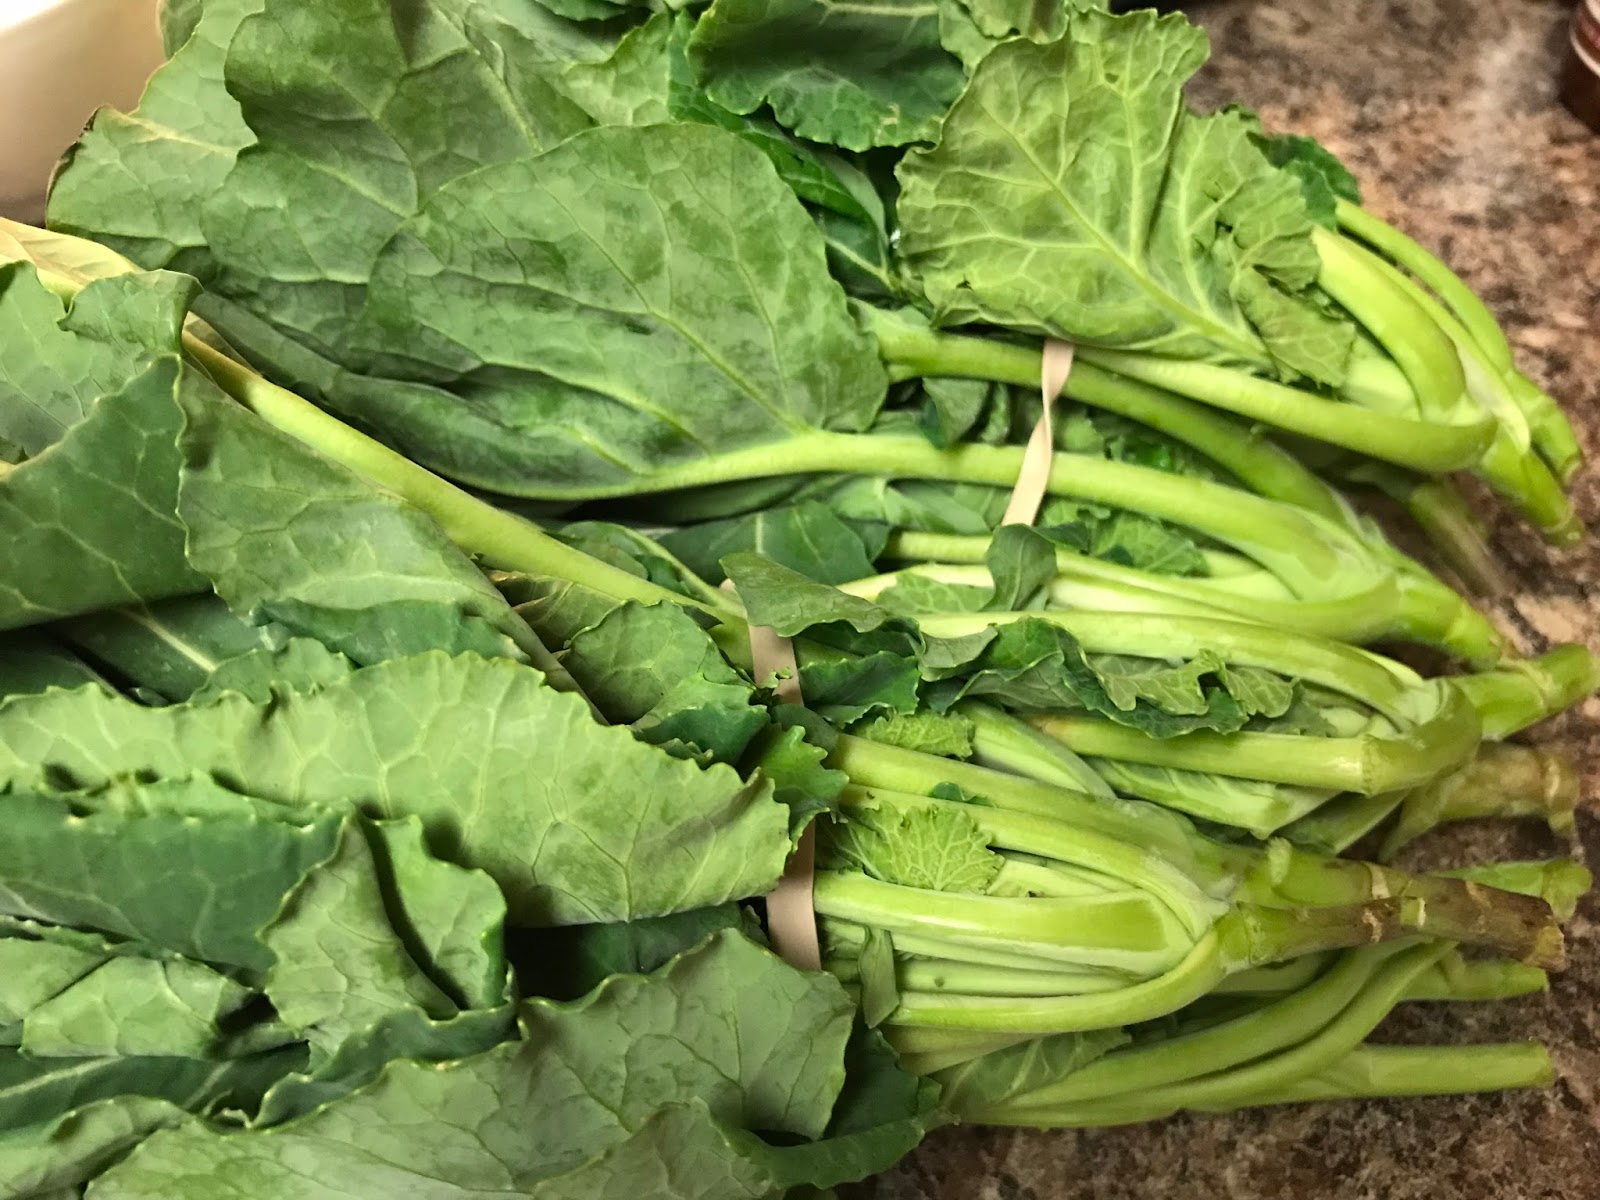
Now for the preparation. You have to remember that these are not the big leaf collards that we are getting from the grocery store. The collards at Bradford Family Farm are tender, crisp, young collards that could be eaten raw if you chose to. The collards are also just out of the field, so you can't get any fresher than just picked greens.

The preparation of the collards is very simple. Just cut, wash and cook for as short or as long as you like and finish any way that you like. The collards are so tender and fresh that you won't need to do much for flavor, it's there already. 

I had two pounds of collards and I prepped the collards for each cooking preparation the same. It was in the actual cooking that each pound was different. To begin preparation, I cut off the stems just above the root area, and chopped the remaining stems, which are very tender. I rolled and cut the larger leaves. This is called a chiffonade. "made of rags". in French. This is how our cook in Alabama would cut them for cooking when I was a child.


Roll leaves and cut across to chiffonade

"Rags"


Applewood smoked, uncured bacon, for the first cooking


Greens including the tender stems go into the skillet


A triple cover for the iron skillet

After the collards, including the tender stems are cut, wash the greens 3 times, changing the water each time. On the last wash, lift the collards gently out of the water and place them in a bowl.

When you have finished your collard preparation, cut 6 slices of applewood smoked, uncured bacon,  into pieces and add it along with 1/2 tablespoon olive oil, to a large iron skillet. Cook the bacon until  brown and crisp, remove the bacon from the fat, to a small bowl and set aside. Have your greens ready at this point. Keep the bacon fat and oil at medium high (6 on the electric range dial) in the skillet.

Add the wet collards to the fat in the skillet over medium high heat (6). Be careful, because when the collards hit the fat, so to speak, they will hiss, sputter, spit and splatter at you. But, this is a good thing. This is what we call frying collards in Alabama cooking, and after the frying, this water on the collards will be used to steam them.

Stir the collards a few times to coat them with the fat, and place a piece of parchment, and foil over the collards and then a tight top. Turn the burner down to 4 or medium low. Uncover every few minutes to stir. It won't take but about 15 minutes for the collards to be cooked and ready. Use your own judgement on how tender you want them to be. Salt carefully. Remember that you have a bunch of collards that will shrink down a lot, so don't salt until the shrinking starts.  If the collards become too dry before they are done to suit you, add a small amount of water or chicken broth to finish cooking.  When the first pound is ready, but before removing from the heat, stir in one teaspoon of brown sugar, one teaspoon or to taste, red pepper jelly, and one a dash of red pepper flakes. When ready to serve, add the bacon.

The best one-
The second pound was cooked in the same method as the first but without the bacon. Just add about 3 tablespoons of olive oil. I used a California Olive Oil with a butter flavor. Use a medium high heat (6 on an electric range). When the oil is very hot, add the collards and after a few stirs, turn heat down to 4 or medium low. Add a small amount of water if needed to keep them from getting dry. Salt to taste.

This was the best one of all. Nat Bradford told me that after I'd cooked the collards, to drizzle a little Watermelon Molasses across the top of them before serving, So, I put the cooked collards in a bowl, and  I not only drizzled the molasses across the top of the collards,  but drizzled a little apple cider vinegar to balance it out. Toss slightly before spooning onto a plate. "Oh, my gracious alive", is what my late mother would have said.


Happy  New Year!


For information on the Bradford Family Farm, and to order any of their delicious products, go to BradfordWatermelons.com.


Friday, December 22, 2017

Leek & Laughing Cow Soup


I was served this soup at a Christmas party that I attended in Columbia. It was so delicious that  I asked for the recipe. I cooked the soup tonight and the only problem is that I can't stop eating it! The recipe is so simple and takes such a short time to make. Who would guess that it's made with Laughing Cow Cheese.  Here goes.

Leek and Laughing Cow Soup

1 lb ground beef
2 leeks, white part only, cut into rings (washed well)
8 ounces sliced mushrooms (optional)
4 (21g) packages of Laughing Cow Garlic Cheese with Herbs*See note below
1 (171g) package Laughing Cow Original Swiss*
3 cups chicken broth
1 cup heavy cream
Nutmeg

Brown the beef over medium heat in a heavy Dutch oven. Add the washed and drained leek rings, and mushrooms. Cook for about 5 minutes, or until leeks and mushrooms are done. Add the packages of cheese and mix in until incorporated. Add the chicken broth and bring to a boil. Lower heat and simmer for about 5 minutes. Add heavy cream, and bring back to simmer and cook until heated through. Add salt and pepper to taste. Sprinkle each bowl or cup of soup with grated nutmeg.
*There are 8 (171g total) packages of individually wrapped cheese in each package of Laughing Cow cheese. You will use one entire package of the Laughing Cow Swiss Original (8 packages) and half  (4 (packages) of the package of Laughing Cow Garlic Herb. You can use more if you really like the flavor of garlic. For me, 4 packages of garlic herb was enough.

Enjoy.


Wednesday, July 26, 2017

NO WORK, CHILI SOUP WITH TORTILLA CHIPS & SOUR CREAM!

My Mistake-Summer Chili Soup

First, let me say that I am a soup lover. It doesn't matter if it's 100 degrees out there. When I want soup, I want soup. I have talked to several other people lately who've told me the same thing. Maybe it's our real longing for fall and cooler weather, or even just plain old comfort, but whatever it is, I've had some kind of soup almost every night this week.

I needed a new soup recipe, and this one needed to have a short list of ingredients, and ease of preparation. I found one similar to the one below. No chopping onions, or peppers or garlic, so joy! I wrote down the list of ingredients on a scrap of paper, and headed for the store.

With list in my hand, I started with the main ingredient, the beef. I knew that I wanted to buy the store brand of organic lean beef, and that was the easy part, but the other ingredients were impossible to find. No joy! That's when this recipe was modified as I walked down the aisle telling myself that I could substitute this instead of that, and you know how the rest of the story goes. I know you've done it too.

I came home with my groceries, got out a Dutch oven and started cooking. This is what I came up with, and it was really good. You might want to add more or less seasoning. Depends on you. I have enjoyed it two nights in a row.

1 pound organic ground beef, 93% lean
1 (12.7 ounce) package Birdseye Southwest Style Protein Blends
1 (14.5 ounce) can diced tomatoes, Zesty Chili Style
1 (8-ounce) can tomato sauce
1 (14.5 ounce) can beef broth
1 teaspoon, or to taste of McCormick Perfect Pinch Mexican Seasoning
1 teaspoon, or to taste chili powder
Salt and pepper to taste

Brown the ground beef over medium heat, until brown or cooked through. Open the package of Birdseye Southwest Blend and pour the ingredients over the beef, and then add the tomatoes, tomato sauce, beef broth and seasonings. Stir until all ingredients are combined. Bring to a short boil, and then cut the heat down to a simmer, cover and cook until vegetables are tender, about 15 minutes. Check for seasoning.  Serves 6. Serve with crushed tortilla chips, or corn muffin and sour cream.

Saturday, April 1, 2017

Country Dinner with Macaroni & Cheese, & Strawberry Galette, Oh Lordy!

MACARONI & CHEESE

On Friday afternoon, I decided to make a real country dinner. So, I had fried chicken, macaroni and cheese, tiny green beans with butter, sliced tomatoes and cornbread. The mac and cheese was the best I've made in a long time, and the connoisseur of mac and cheese, McK, gave her approval by having a plate full of the golden goodness.
 
After dinner, we enjoyed Strawberry Galette with vanilla ice cream. What a treat for a Friday night dinner.
 
So here you go, for those who want to try the mac and cheese. The Strawberry Galette recipe is below. It was really good if I do say so myself.

 
 Macaroni & Cheese
 
First, a little tip about macaroni. If it's not salted enough in the cooking process, your mac and cheese will be as bland as your macaroni. After all, it is the main ingredient. So, near the end of the cooking process, check the taste by taking out a spoon of macaroni and tasting it! If it's not salty enough, add more salt and continue cooking. You might also do the same when you assemble the casserole, before you add the eggs, to make sure you have enough seasoning.
 
 
1 (16 ounce) box macaroni, cooked in boiling salted water and drained

1 (8-ounce) block of seriously sharp Cheddar cheese, grated
1 (8-ounce) block of Vermont extra sharp Cheddar, grated and divided
4 eggs, beaten
2 cups heavy cream
Salt and pepper to taste
 
Preheat the oven to 350 degrees. Spray an oven proof baking dish with non-stick cooking spray.
In a bowl large enough to hold all the ingredients, add the macaroni, heavy cream, the seriously sharp Cheddar and half of the grated Vermont Cheddar. Add salt and pepper as needed. To this mixture, add the beaten eggs and mix well.
Place the mixture into the baking dish and top with the remaining Cheddar cheese. Spray the underside of a piece of aluminum foil, and place it over the baking dish. Baking time will depend on the size of the baking dish you use, but if it's a 13 x 9-inch dish, it will be about 40 minutes, or until it's bubbly around the edges and at least 170 degrees in the center.


 Strawberry Galette
 
Made from those fresh strawberries that I picked in the strawberry patch last month.
 
1 pie crust, ready made or home made, large enough for a 10-inch pie plate
4 cups cut roughly cut strawberries
2/3 cup sugar
1/2 tablespoon cornstarch
2 tablespoon strawberry jam
 
Preheat the oven to 350 degrees. Spray the pie plate with non-stick cooking spray. Lay the pie crust in the plate. Mix the cut strawberries with the sugar and cornstarch, and place them in the crust. Pull the crust up around the strawberries. Bake until the berries are very tender and the crust in light brown. It will take about 35-45 minutes on convection. When done, warm the strawberry jam, and spread it on top of the berries. Serve warm or wait until room temperature and slice the Galette.